Silhouette has a new design for their pen holder, which we carry at MakeitScrappin.com, so I decided to try it out. I was curious how it would do drawing a sketch I found online...so I went with a DaVinci. Go big or go home, right? :)
 |
| da Vinci's Mechanical Wings sketch |
 |
| My version, using my Silhouette Pen-Holder and a fine tipped marker. |
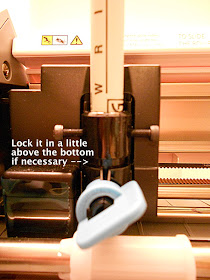
So, in using this pen holder, I found that for the type of pen that I was using, it was necessary to make a slight modification.
If I put the pen entirely in, and then locked the pen holder into place on my Silhouette with it locked all the way down (as far down as it will slide in), the pen would drag and leave lines whenever it moved to start drawing from a new place, because the pen was too close to the paper to start with.
I am not sure if this is just because of the type of pen that I had, but this was the case that I had with my regular ball-point pen that I tried this with as well. But, not to worry, it was EASY to fix, and totally worth the outcome, I think.
So, do a small test with whatever pen you are using in this pen holder (ball-point, sharpie, etc.) to be sure the pressure will be correct on the paper. For my pen, I found all I had to do was lock the pen holder in slightly higher than I normally would (i.e. not let it drop all the way in before locking it into place), and it worked perfectly for this particular pen.
This solved the problem, and I got my sketch, along with some sketched text to go with it.
I added a little color using some colored pencils (by hand) on the final product...
 |
| Genius--sketch a little yourself on the finished product, adding a little color from colored pencils. |


No comments:
Post a Comment