Wednesday, October 30, 2013

Spooky Glowing Eyes: Halloween Day Craft

Okay, okay, so I wanted to make one last Halloween decoration to share with you as a simple project that will put the perfect finishing touches on your home's Halloween appearance tomorrow night (the 31st).  Because you are using glow sticks that are sealed off in the tubes, you only will use these on Halloween night; aka, they only get one use, so pick your night to accordingly.  (You could, technically, unseal them and add a new glow stick each night.)


Materials Needed:
Cardboard tubes (from toilet paper, paper towels, or wrapping paper)
Glow sticks
Duct tape
X-acto knife (or small cutting razor blade)

I apologize that I didn't post this earlier so that you knew to save your toilet paper and paper towel tubes...but hopefully you have something readily available enough that fills the same purpose.

First, I cut out some "spooky eyes" that I found online (free clip-art).  I saved the image to my computer, opened it in Silhouette studio, and using the "Trace and Detach" function, was able to get the outlines of each of the eye-shapes.  I deleted the ones I did not want, then selected each of the ones I did.  Once they were selected, I used the "Cut" window, and selected "Cut outer edge" so that they would be cut.

Use the "Trace and Detach" function in Silhouette Studio to convert images you get off-line into cut-able images in your Silhouette.

Roll a Jack-O'-Lantern Game

Want a last minute, quick and easy idea for a child's class Halloween party, or for your own festivities Halloween evening with your children?  Try this simple "Roll a Jack-O'-Lantern" game.  Should take you just a few minutes to make, and then you'll have some fun entertainment for young kids ready to go!

Here is all you need:

* Black paper
* Orange paper
* A die (aka, singular of dice :) )
* Your Silhouette or Cricut (Cricut if you have the Monster Bash cartridge, or Pumpkin Carving seasonal cartridge)

Tuesday, October 22, 2013

Frosted Vinyl Ghosts and Ghouls

Here is just one more quick bonus post today, for an easy idea you can make in all of about 5 minutes!

Find a ghost shape that you like online or from your Silhouette library.  Use our Silhouette Frosted Glass Vinyl to cut out your ghoulish shapes and then apply to your windows and/or mirrors!  The kids are already claiming who gets to be each ghost on the window. :)


For this image, we cut it out a few times, flipping it horizontally for the second cut so that they faced opposite ways.  We used both the outline and the "filling" to maximize our cut.  Super fun and easy!

Use our Silhouette Frosted Glass Vinyl to cut out ghosts for your windows
Try using both the outline and inner portions to maximize your cut


See you in 5 minutes with your cute new see-through ghosts.

Note:  Vinyl can peel off glass with no residue left behind, so don't worry about that.  In case you were. :)

The Real Bat-Mobile

I'm sure that when I say "Bat-mobile" people picture something more like this:


...and I let them, because I think it's clever.  Especially since, in reality, I mean this:

Homemade "Bat Mobile"
Okay.  So it isn't the cool car driven around by Batman.  But it is a mobile of bats, thus, a bat mobile, and a pretty cool one at that.  So I persist in telling people I made a bat mobile, and smiling when people wonder why I'd make a model comic car.  :)  

I got this idea from something similar done by Martha Stewart, but I used my Silhouette to size and cut out the bats for me, which made it easier.  Martha didn't have a Silhouette. Poor Martha.  So here's how to make this simple project for your home Halloween decor!  

Tuesday, October 15, 2013

Spooky Halloween Mirror: Happy Hauntings!


Hey there, friends!  So this week's Halloween craft post was inspired by a craft I used to make at summer camp.  By scraping off the backing of a mirror, you can place an image behind it and make it look like it is in your mirror--or like your reflection is replace by whatever image you place behind it. (The wheels start turning.....) Hey--perfect idea for Halloween or what?! :)  The possibilities of making ghostly visitors appear in these Halloween decorations is endless. (See Jack, the Pumpkin King, gracing us with his ghostly presence in the mirror below.)


The Pumpkin King looks like he is wanting to join me on my couch for a visit
So off I went to the dollar store to buy myself a mirror.  If you have vinyl and a razor blade on-hand, this nifty little craft will cost you just the price of the mirror, i.e. $1 from the Dollar store!  Thanks, little green store.

Thursday, October 10, 2013

Witch's Shoe with Oreo Striped Stocking, Halloween Craft

It's Halloween season, and that means time for some fun Halloween crafts. Make this fun, but fitting Halloween gift for a friend, teacher, etc.  


I found this 3D heel on the Silhouette Online Store.  Cricut has a similar one with their Princess Party cartridge.  

Wednesday, October 2, 2013

Picture Perfect Play Room: Cricut Style

Want a simple way to dress up your play-room for cheap?  Try framing a few Cricut die-cut shapes and words on scrapbook paper.  Create whatever theme you like. 

For my the playroom at my sister's, she chose some bright colored paper that matched with the other items in her room, and then chose a few images and went at it.  

The first two (owl and mushroom) are from the Cricut cartridge "Paisley", which we carry on our website.

Owl from Cricut Cartridge "Paisley"
Mushroom from Cricut Cartridge "Paisley"

The third image (the monkey) is from the Cricut cartridge "Life's a Party," which we also carry.  Both are fun cartridges.

Monkey from Cricut Cartridge "Life's a Party"
I really like them created with the fun print papers.  

Next, she just hung them along her long wall in three matching frames.  Easy, cheap, and cute!


Enjoy! And send pics of any project you've done that's similar!  Would love to see how you are all using these great machines. :)

Owl from Cricut Cartridge "Paisley"

Tuesday, September 24, 2013

Mud Room--Home Base

Have a mud-room in your house and looking for a simple decoration?  Look no further.  This super easy project is cheap and quick.


1. Go to your local craft store (or hardware store, for that matter) and pick up four boards of varying sizes (or all the same size, if that's your thing).  They shouldn't cost more than a dollar or two each.
2. Paint them whatever color you like (I obviously picked black). Then choose a contrasting vinyl color.  We have tons to choose from in Silhouette vinyl and Cricut vinyl. :)  Go ahead, go color crazy.   (I used 'sand' Silhouette vinyl, in this case.)
3. Choose two or four different fonts for your letters, alternating them, then cut them out according to your sizing preference.
4. Apply letters to your board. (Put transfer tape over your cut letter.  Press it down firmly with your scraper.  Peel it up off of the backing--the vinyl letter should now be attached to the transfer tape.  Position in on your board.  Press down and then use your scraper to rub and secure it in place.  Peel off your transfer tape.  Vinyl should be attached to the board.)
5. Tie and attach sheer ribbon (or ribbon of your choice).  I attached the ribbon with a hot-glue gun, also tying a bow and glueing it to the front to give the appearance of having it tied through the wood.  If you want to drill some holes, go for it.  Glueing worked just as easy, in this case.


Finally, just hang your letters from some coat hooks, and voila: you're done.  (If you actually USE your mudroom to hang coats in--we keep ours in the garage--then maybe try hanging these letters down the side, or just as a nice wall decoration!)

Home with your family--gotta love it!

Wednesday, September 18, 2013

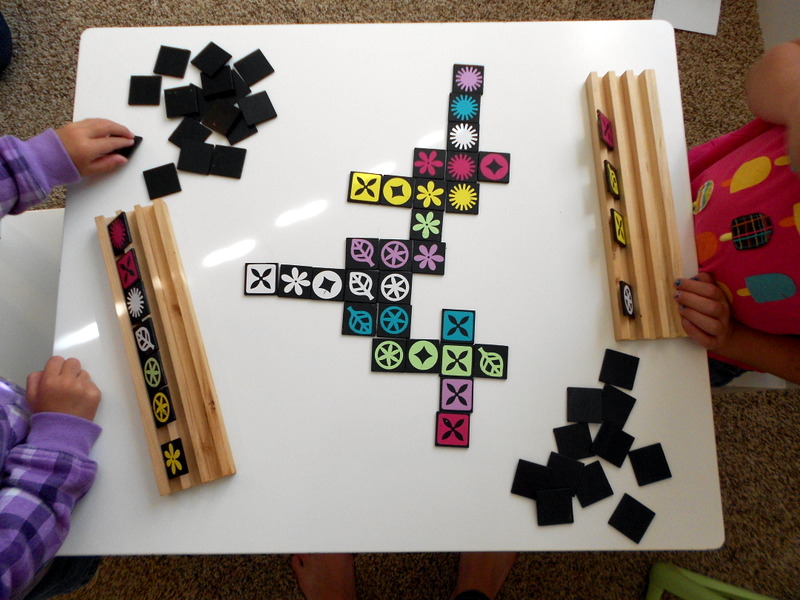
Homemade Qwirkle Game

Never heard of Qwirkle?  Well,...neither had I until a few years ago.  We were camping on the lake with my extended family, and a cousin introduced me to this great game.  It became the late-night game of choice for all the cousins, big and small, and we soon all knew we wanted our own Qwirkle set at home.


(To learn about how to play Qwirkle, game rules, etc., click here.  It is really quick and simple, and yet has won tons of awards. You can use this link to print out your own instructions for your homemade version as well.)

My Dad is also a big fan of new games, and I thought this would be a fun Christmas gift for him. Rather than put in the $25 or more to buy the game at the store (why are board games so expensive?!) I decided I'd rather put in some the time to make him his own personalized version of the game.  While I was at it, I'd make one for my sister, Mom, and myself as well.  Go big or go home, right?  The game pieces themselves are simple enough, and all I needed was the following for one set:

Materials Needed
*108 1x1" square wooden tiles (I found alphabet tiles and just spray painted over them)
*6 different colors of vinyl, enough for 18 pieces for each color (the shapes will be smaller than 1x1" each)
*Black spray or craft paint

To make your set, spray or paint each wooden tile black. Allow to dry.  Because there are so many tiles here, spray-painting them was a pretty easy route.  Just know that if you buy colored wooden tiles, it will take more paint to spray over the colors uniformly, so you may touch-up with regular craft paint.

Next, pick and lay aside 6 different colors of vinyl.  You can use whatever colors you like, but it is nice if they contrast.  Bold and bright colors look nice against the black.  See the original game for ideas.

Now, pick six different simple shapes that you have from different Cricut cartridges, or from your Silhouette library.  You'll want to make them different enough from each other that you don't have to think about it much when you play. :)  For my Dad's set, I picked simple images with a garden theme, such as a leaf, rake, flower, watering can, etc.  He loves to garden. :)  For my sister, I just chose some fun geometric shapes and whatever I came across first that didn't look too similar.

Homemade Qwirkle Game

Once you have your shapes, cut out three of each shape in each color vinyl.  I.e. If you are using a leaf shape--cut out three leafs in red, three in purple, three in green, three in blue, etc.  Do the same for each shape.

Obvious Note: The shapes need to be small enough to fit on your squares. :)  I hope you figured that one out on your own, but if not...measure them before you cut. :) Practice cutting them on a piece of regular paper to be sure.

Next, use your transfer tape and scraper to apply the vinyl shapes to your now dried black squares. When you're done...you're done!  Buy (or make) some tile holders from the store to help hide your pieces as you play.  These are dominos holders.  You can also just borrow your Scrabble tile holders. :)  Throw all your pieces in a bag, and voila--new homemade game that the entire family can play.  Even my 5 year old niece loves this game.  Not to mention her mother. :)   If you are feeling lazy, you can always buy the game here...but then what are you reading a DIY blog for? ;)

Enjoy!


Tuesday, September 10, 2013

Lil' Frogger, Silhouette Fabric Paintin' on a Onesie

Remember that old Atarti game, Frogger?  The one where the frog has to move across traffic and jump logs and such to get to the lily pad on the other side?


Yeah. Memmmoories. ;) Well, in memory of that, hop on over to our website and get some individual fabric paints (which you can mix to create your own colors, especially with the base colors) or the Silhouette Fabric Paint Starters Kit and let the fun begin as you make all sorts of great stuff.  For instance, this cute lil' Frogger onesie that I made for a friend's hoppin' new baby. :)


To make this, I bought the lil' onesie for only $2.50 at Wal Mart (love cheap onesies), and then got to work on my design. First, I found the title and frogger image online, then I used Silhouette Studio to trace, detach and then form a cut-away image for my design.